Category Archives: Essays

This is a very boring name for me writing about the stuff that’s on my mind. I strive to make the essays more interesting than the word “essays” and this description.

Technocane

The Technocane is what happened when, in my own words, “I taught my stick how to carry my phone so that my phone would teach me to never leave home without my stick.

This page is a parts list and a quick instruction set for building your own.¹

The Type I Technocane

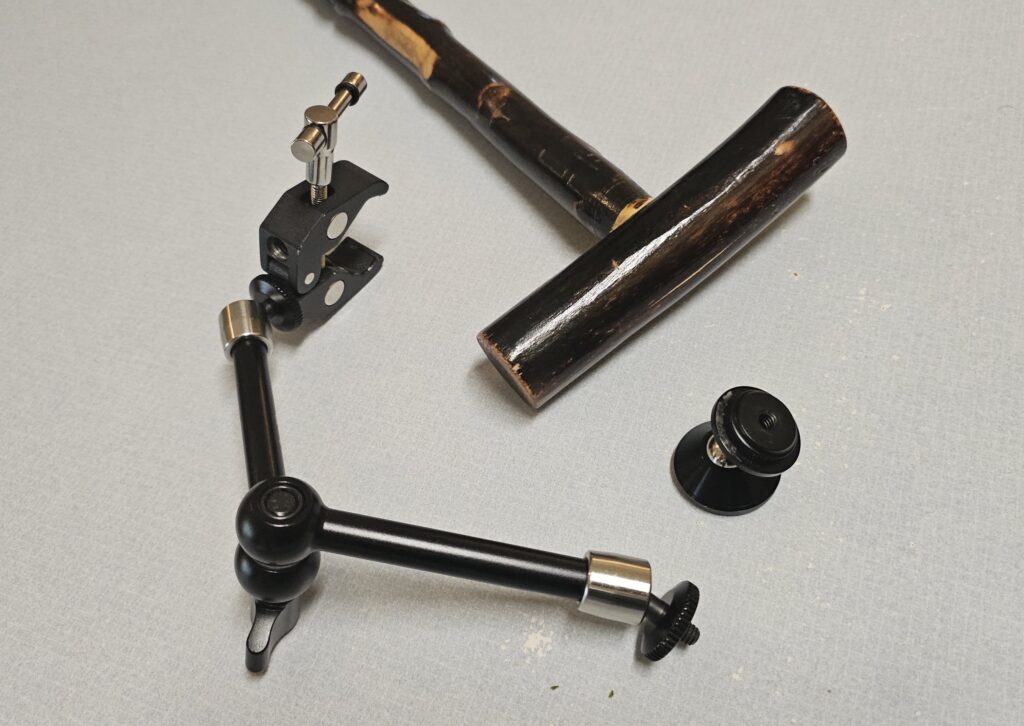
The simplest Technocane to build is the Type I: take a cane or walking stick that already fits your hand, your height, and your needs, and simply attach a piece to it to carry your phone. Here are the parts you’ll need:

A wooden cane, a SmallRig Magic Arm with a C-Clamp, and a Coolpow  phone magnet with a thumbnut glued to one end.

You’ll also need some simple tools

  • Superglue (you’ll only need a couple of drops)
  • Hobby Knife or File or Box Cutter (to improve the glue bond)
  • Pliers (depending on your hand strength you may or may not need these)

Summary of What’s Coming

It’s pretty simple. You’re going to remove the tape from the dashboard mount, glue the thumbnut to it, and screw that assembly to one end of the Magic Arm. The other end of the arm clamps to your cane, and the rubber band gets wrapped around the clamp lever to keep it from rattling. And that’s it. Now, the details:

Instructions: Mag-mount Prep

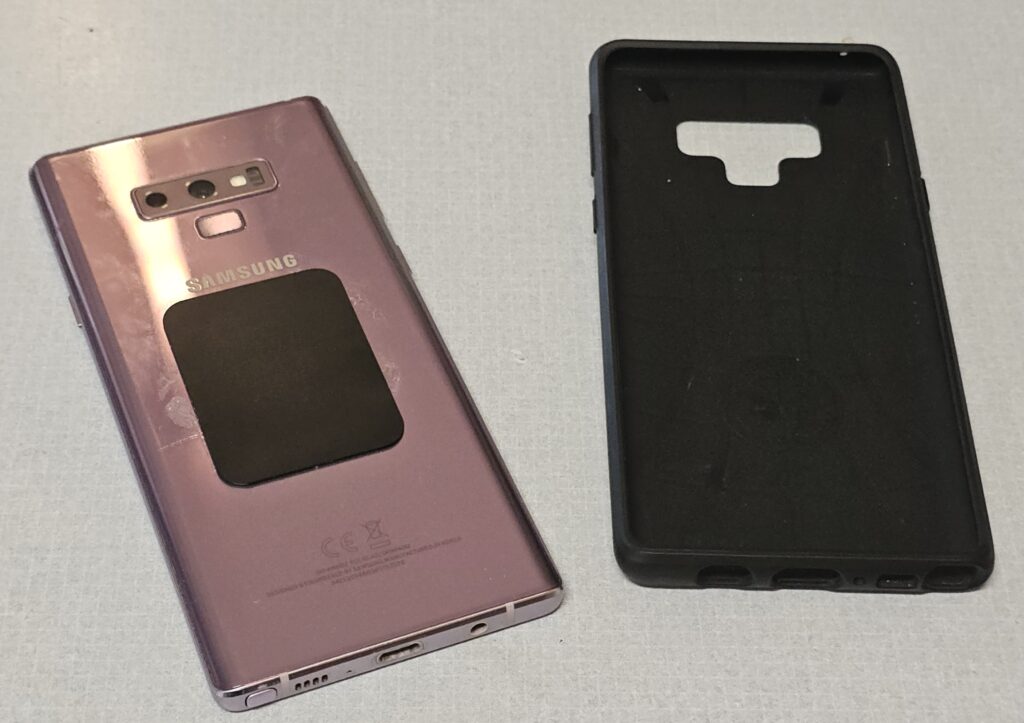
Before beginning, make sure that your phone case will securely mount magnetically to the Coolpow component. If it won’t there’s no point proceeding until you have a phone case that will work².
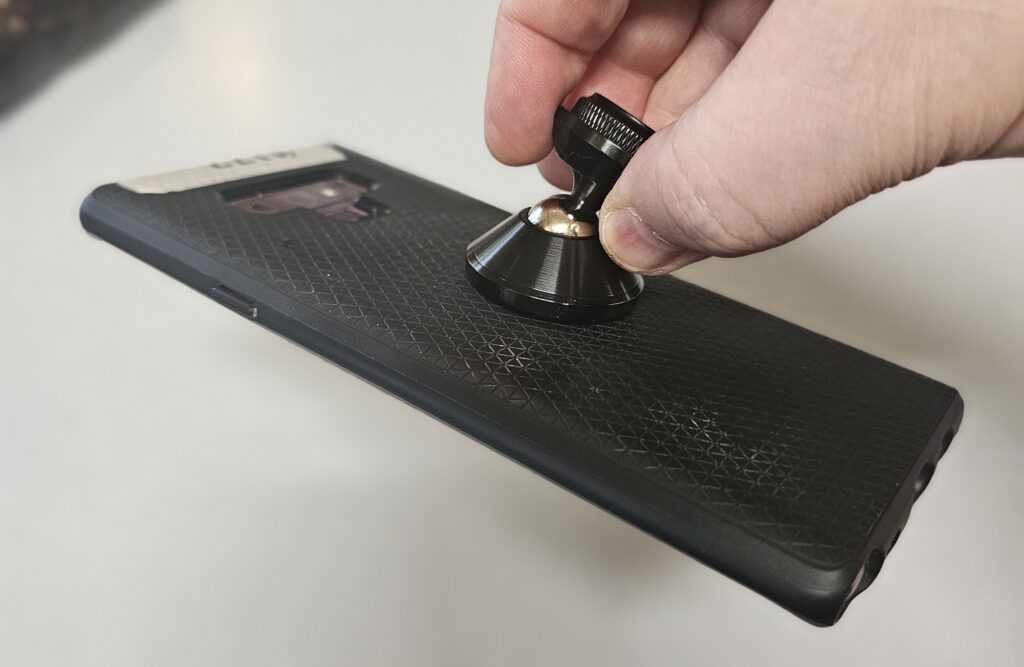
  1. Remove the tape. Take the Coolpow mount and peel all the sticky backing off of the side that attaches to the dashboard. This takes about five minutes, and is easily the most tedious part of the entire project.
  2. Score the mount: With your knife, file, or cutter, carefully score the now tape-free dashboard side of the mount. Lots of little lines in a couple of directions.
  3. Score the nut: Score one side of the metal thumb nut, same as with the mount.
  4. Glue the nut to the mount: Glue the scored side of the thumb nut to the dasboard mount. Take care to align the screw hole with the (now exposed, it was hiding under the tape you removed) recess in the dashboard mount. This will give the screw on the Magic Arm room to screw in past the the thumb nut without pressing against the mount and popping the nut off.
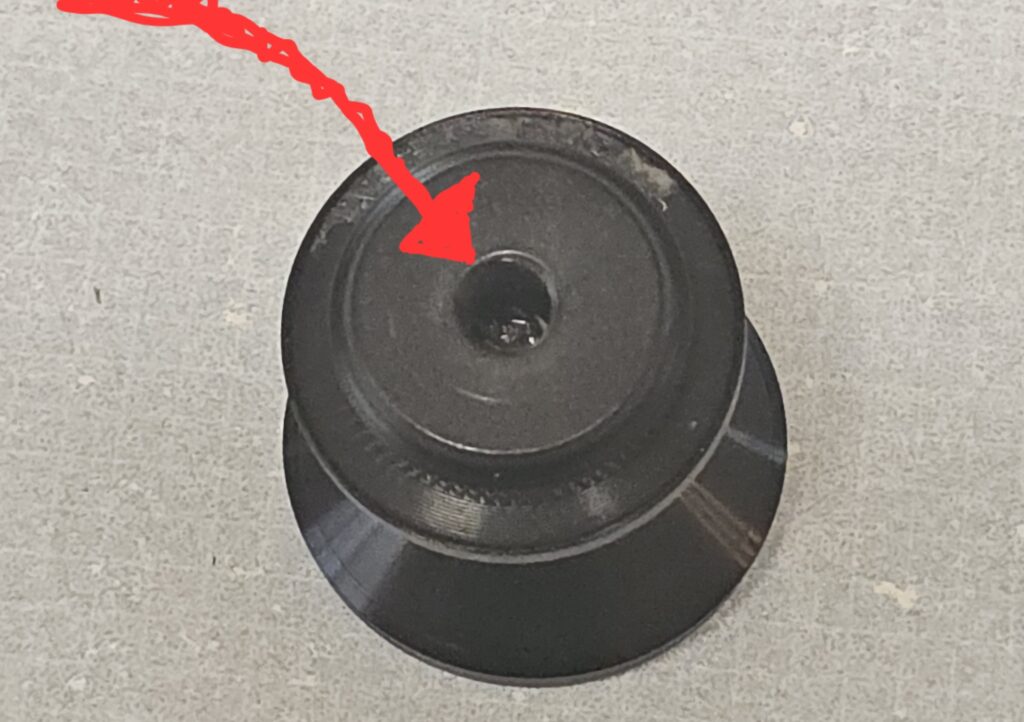
Those four steps should take maybe six or seven minutes. Wait another five minutes before proceeding. The superglue needs a bit of time to cure, especially if you used too much.

Instructions: Assembly

Here’s where you attach the mounting magnet to the arm, and the arm to the cane. It should go very quickly.

  1. Loosen the Magic Arm using the adjustment knob at the elbow. Extend it to be straight, then tighten it back up. This will make everything else easier.
  2. Attach the mount to the arm: Screw the magnetic mount assembly onto the SmallRig Magic Arm. There’s a thumbnut on the Magic Arm already, and it has silicone grippy-rings in it. These should let you screw the mount down securely by hand. The silicone pushes back against the nut “jamming” the threads.
  3. Attach the arm to your cane: Spin the lever on the clamp and open it wide enough to clamp to your cane. Slide it onto the shaft just below the handle, where you won’t be hitting it with your knuckles when you hold the cane. Aim the arm in the opposite direction of the handle, so it points forward when the cane is in use. Tighten the clamp.
  4. Arrange the Magic Arm to reach forward and up: Using the adjustment knob at the elbow, bend the arm up and forward, keeping the arm in the same plane as the cane handle. Note that there are some slots in the ball joints that wil allow more movement in one direction, should you need it.
  5. Mount your phone on the magnet: just place your phone on that mag-mount. Check and see if it’s where you want it. If it’s not, adjust the arm again.
  6. Once it’s all aligned, tighten everything: Screw that elbow knob down as tightly as you can. Tighten the clamp some more. Make sure the mount is screwed tightly to the Magic Arm. Take the rubber band and wrap it around the clamp lever to keep the lever from jiggling and making noise.
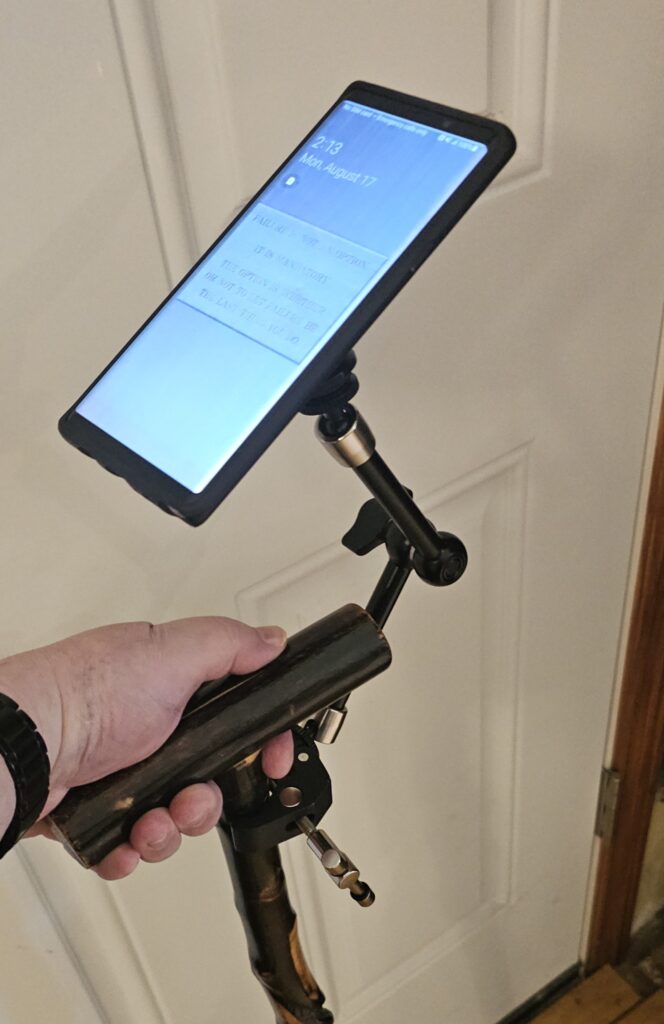
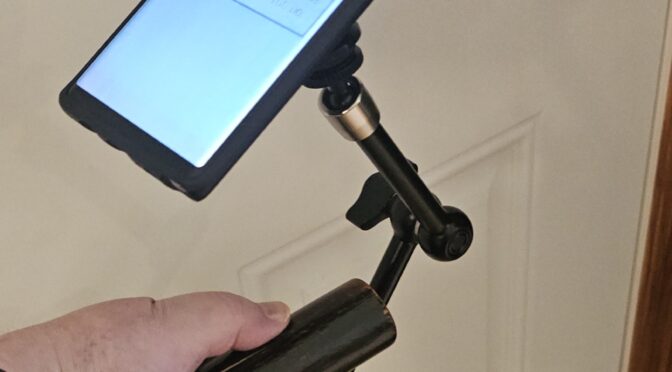
The assembled Type I Technocane. It's a SmallRig Magic Arm clamped to a simple wooden cane. The free end of the SmallRig Arm has a magnet mount on it to hold my phone.

Care and Feeding

Maintenance is pretty simple. Here are the things that are most likely to need attention:

The clamp-to-arm screw. This will tend to loosen over time. You have all the leverage, though. Use the arm as a lever. Tighten the elbow HARD, then lean on that lever and screw the ball joint into the clamp just as tightly as you can. This will take the arm out of alignment with the cane, but that’s easy to fix. Loosen the elbow (which loosens the ball joint, but not the screw), re-align it, then tighten it back up.

The magnet-mount screw. Again, it may loosen over time. Pliers might help here.

The nut-to-mount glue bond. Superglue bonds are very strong, but they’re brittle, and may get more brittle with time depending on the glue, the temperature, the humidity, etc. The easiest way to maintain this is to build a spare. The Coolpow magnets come in two-packs, and photography thumbnuts are maybe a buck each. The good news: I’ve only had one of these bonds fail on me, and I’ve glued at least a dozen thumbnuts to Coolpow magnets.

The Coolpow Magnet: This is a silicone cap over four rare-earth magnets. If you aim this at a big, high-strength bar magnet the magnetism will overpower the chemical and mechanical bond that keeps the silicone cap attached to the cup. This is annoying to fix, so 1) don’t aim your cane at large bar magnets, and 2) build a spare, just in case.

The clamp-to-cane joint: If you have a hollow aluminum, steel, or carbon-fiber cane, that clamp can crush it if you crank the lever hard enough. If you’ve dented the cane by over-clamping, then from time to time you may want to check and see that the cane isn’t deforming further. The failure mode here is the cane head bends or breaks and you fall down. It’s super-unlikely, but it’s worth paying attention to. If you have a solid-core cane (wood or whatever) then this won’t happen.

Field Notes

I’ve been using the Technocane for almost four years now. I built mine using a monopod, and I iterated a LOT before I found something that worked. My personal Technocane is the Mark XII Type II, a carbon-fiber Manbily Monopod with the Magic Arm screwed directly to a hardpoint on the monopod.
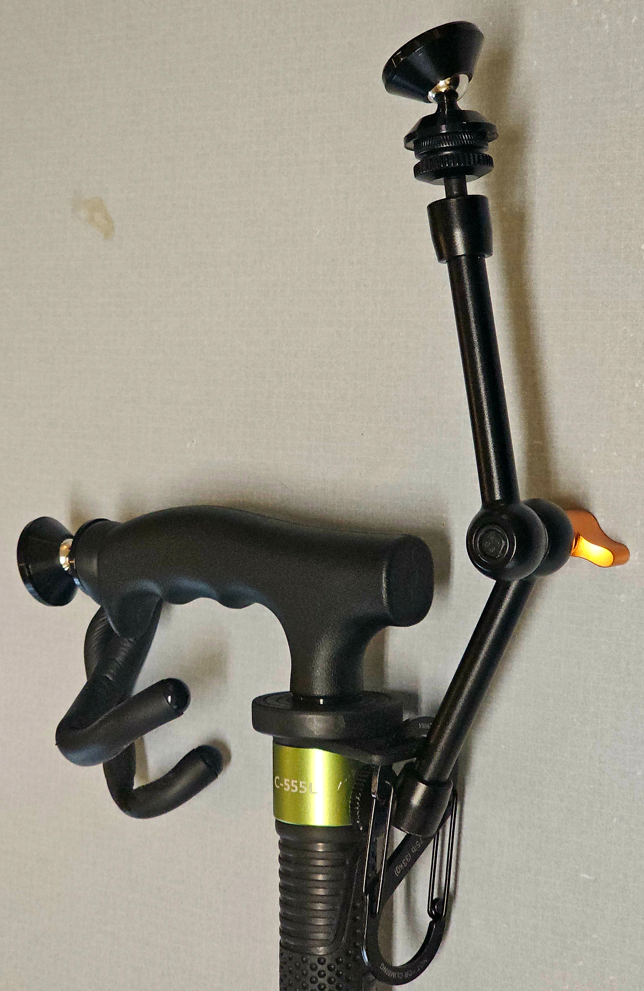
A Manbily C-555L Monopod with the Magic Arm assembly for the phone, a spring-clip for attaching car keys, a padded twist-tie for hanging it over a chair, and a magnet on the handle for docking it against a steel door frame.

“Mark XII, you say?”
Yes. Mark XII. Twelve major iterations before I arrived at the current design. Early on I tried phone clamps instead of magnets, but they failed quite often, and mounting the phone took two hands (not good, I need one hand on the cane to hold me up.) I think I spent close to $800 on trial-and-error before getting here.

I can now build the Type II Mark XII in about 45 minutes, and it costs around $110. Why, yes, I’ve built a spare, and I have a Type I on the bench as well, just in case. See, once my phone taught me not to leave home without my stick, I realized that spare sticks were just as important as spare shoes, or an additional set of car keys.

Is it perfect?

No.

I’ve knocked the phone off the magnet more than I care to admit. Fortunately my magnet-compatible case provides good protection, and if I’m being honest with myself it’s infinitely more likely that I’ll fumble the phone from my hand if I’m trying to use the phone while holding a regular, non-technocane cane.

But I do want to build a fix for the “knock the phone off the magnet” failure mode. I’ve already built it in my head. I just need a machine shop, because this isn’t gonna work with off-the-shelf components.

And that’s beyond the scope of this article. Let’s get back on track.

Brands, Off-Brands, and Substitutions

I listed what I listed because I’ve tested a lot of things. Please, save yourself some time and just use the brand names and the specs I described. Here’s why:

Smallrig & Coolpow vs Other Brands: I’ve used three different brands of “Magic Arm” and four or more of the magnet mount, and here are my findings: Buy SmallRig and Coolpow.
– Smallrig end-pieces, the ones that hold the ball joint in place, are one solid metal piece. Other brands are TWO pieces, and will break when over-tightened, rendering the arm useless.
– Coolpow magnet containment (the silicone cap) is pretty reliable. It has failed me once, and only when I docked it on another Coolpow magnet. Off-brand has failed five times, and three of those were regular use. The cap and the magnets ended up stuck to a steel door.

Metal vs Plastic thumbnuts: Don’t bother with plastic. It’s less sturdy than the glue bond, and plastic degrades rapidly with things like sunlight, air, and time. Anodized aluminum is the way to go.

Superglue vs Epoxy, B-7000, etc: Superglue is easy, it’s fast, and it’s pretty hard to break that bond. Epoxy isn’t as brittle, but it doesn’t seem to grab the surfaces as well. B-7000 is flexible and amazing and don’t bother, it’s for gluing electronics together, not for load-bearing stuff.

Footnotes

¹ I don’t sell anything here. I don’t sell the components, I don’t sell the instructions, I don’t sell the finished product, and I’m not paid for the Amazon links. A cane is a medical device, and is rightly subject to all sorts of product testing, registration, and licensing. I’m not in the medical device business, and you don’t need me to be, because you can build your own without worrying about that.
² The Coolpow mount is not designed to work with cases that allow for cordless phone charging. Mounts that ARE designed for that use a ring of magnets, and require phone cases with a similar ring that goes around the charging coil without interfering. If you can find a mount like that with a base that can be glued to a thumb-nut (or that already has a 1/4″x20 screw hole), then you can use that instead.

2024 In Review

How did 2024 go for me?

Well, the beginning of the answer to that question can be found in the date of this post. We’re two-thirds of the way through January and I’m only now finding the time and energy to write a year-end thingy.

The end of the answer is a bit bleak. In summary, I learned that I’m more disabled than I thought I was. I still make big plans with high hopes, but then I overdo it and end up “soft” crashing for weeks at a time. This has delayed everything, including the release of Book 18, which we originally planned to be shipping six months ago.

The middle of the answer, the meaty part, would be a retrospective itinerary of sorts, and I’m not sure I have the energy for that kind of detail.

The high points: I finished everything that was keeping Book 18 from being sent to the printer, and I started working on the Bonus Story for Book 19. I attended GenCon Indy, WXR 2024: Write on the Navigator, and Dragonsteel Nexus. I learned to prepare a wide variety of 6FED-friendly meals for Sandra, and because necessity is the mother of invention I invented a no-egg mayonnaise.

One thing I’m quite pleased with: I spent very little time adjusting, revising, or re-working my zero-gravity workstation. Similarly, I didn’t need to iterate my Technocane. I probably put 300 hours into those things during 2023, and those hours began paying dividends in 2024. I learned that there is enormous satisfaction to be found in consuming the fruits of a job well done.

I wish I’d done more, though. I planned to do more, but the chronic fatigue aspects of Long Covid are, to me, the plow described by poet Robert Burns when he bemoaned the state of the best laid plans of mice and men. My plans were big, but were mouse-sized compared to the churning, earth-moving disruption of this disability.

Bleak, perhaps, but let me play a hopeful note as we return to the end of the answer: I learned a lot about my new limits during 2024, and I began arriving at strategies to make the most of the narrower space within which I must work. I won’t make any promises for 2025, not yet at least, because one of those strategies is learning to take things day by day.

Today has been productive for me. I haven’t done all of the things, but even at my healthiest I was never able to do all of the things. I can accept that. I have learned to take the win, and then take a break.

Beverly Hills Cop: Axel F

Years ago while trying to explain that a bad remake does not ruin your childhood, I described modern remakes as attempts to make money by “strip-mining nostalgia.” And before I explain the metaphor further, let me clearly state that BEVERLY HILLS COP: AXEL F is a much, much better movie than that.

Beverly Hills Cop: Axel F – NETFLIX

Strip-mining is how you destroy the landscape to get at just one thing. The strip-mining nostalgia metaphor kind of means “ruin my affection for the franchise.” And BEVERLY HILLS COP: AXEL F did NOT ruin things.

I watched all three Beverly Hills Cop films before watching this, and then I watched the first one again, with Sandra, who hadn’t actually seen it.

She agreed with my assessment of the first film: the original BEVERLY HILLS COP is a very good movie, and the music deserved acting credit because it was not just instrumental (hah!) to the atmosphere of the film, it helped tell the story in ways that almost-but-not-quite crossed into the line of musical theater.

BEVERLY HILLS COP II was a competent, 80’s-era sequel. The production team knew how to make a good movie, but they didn’t really understand the science of a brilliant sequel. This was the 80’s, almost nobody understood that.

BEVERLY HILLS COP III was awful, and its biggest sin lay in the orchestral variations on Harold Faltermeyer’s “Axel F” theme. They were competent¹ arrangements, sure, but they sounded like they belonged in “Axel Foley Goes to Silverado.” Which I would watch, provided it was not made by the people who made BEVERLY HILLS COP III.

BEVERLY HILLS COP: AXEL F was made by people who do understand the science of a good sequel. It follows the beat chart of the first movie, but it doesn’t just go through the motions. It knows what those beats are for, and why they worked, and it leans into that understanding to deliver what, for some people, can serve as a master-class in making a franchise film.

I’ve read several articles about the production of the film, and the most interesting thing I learned was that they re-recorded the Axel F theme using the original synths, which they got from a museum. This meant the theme had the same *exact* waveforms, delivering that familiar sound even after giving it the deconstruction and theme-and-variations treatment. That one song could now support multiple scenes without making us feel like they were just playing samples of the same song over and over. (Which, thanks to Crazy Frog², is a treatment we have definitely seen applied to Axel F. )

BEVERLY HILLS COP: AXEL F follows the same basic plot as the first two films, in that the audience and the protagonist know who the bad guy is, and the detective work lies in accumulating the right evidence, and then surviving to deliver it³. It also improves on the scene-to-scene flow⁴ of that formula, giving us snappy dialog and dramatic moments that run straight up against action.

I should sum up. I’ve watched BEVERLY HILLS COP: AXEL F twice now, and I have no regrets. I’m not tracking my thresholds lately, but this one definitely clears the Threshold of Awesome. It was better than just “better than I expected it to be,” and that might sound like low praise, but I’ll definitely watch it a third time. Hopefully that helps you calibrate your own expectations.

— notes —

¹ I used ‘competent’ twice because it’s the right word. In the arts it kind of means “knows how to hold a paintbrush, mix colors, and create a painting, but doesn’t know how to make actual art.”

² Google “Crazy Frog” at your peril. It was silly fun twenty years ago, but now it just leaves me annoyed, and ashamed for having liked it once.

³ The third film messes with the formula, giving us a plot twist right at the end. It was a nice idea, but it was not executed well. Just take my word for it. Don’t go watch BEVERLY HILLS COP III. Sure, you can go listen to “Crazy Frog” at your peril but BHCIII is a different level of DO NOT.

³ “Scene-sequel” format, which comes to us from Dwight Swain’s TECHNIQUES OF THE WORKING WRITER, is perfectly employed here. You don’t need to know that to enjoy the movie, but if you are a writer then it’s something you should pay attention to.

Immersion, Emulsion, and No-Butter Hollandaise

I did not expect an immersion blender to become a kitchen essential for me, but that’s where I am now. I originally thought it’d be great for making milkshakes, but then I figured out water-in-oil emulsions, and realized that homemade mayonnaise is a million times better¹ than what comes in the jar.

Summarizing: the immersion blender turns the very technical and tedious process of emulsification into something that is so simple I got it right the first time, and haven’t failed at it yet. Here, then, is a very basic recipe for homemade mayo:

Basic Homemade Mayonnaise

Ingredients

  • 1 egg
  • 1 tablespoon vinegar
  • 1 tablespoon lemon juice
  • 1/4 teaspoon salt
  • 1/8 teaspoon mustard
  • 1 cup avocado oil

Equipment

  • An immersion blender with its own blending cup
  • Measuring spoons & measuring cup
  • A fridge-friendly container for the finished product

Instructions

  1. Put everything except the oil in the blender cup.
  2. Gently pour the oil atop the other stuff, and then wait a moment for things to separate. It’s very important for the oil to be on top.
  3. Gently sink the blender head to the bottom of the cup, positioning it like a dome over the egg, tipping it on the way down to get the air out.
  4. Blend at high speed, keeping the blender head at the bottom of the cup. Slowly lift it, and allow yourself to be amazed as it makes your mixture into mayo on the way up.
  5. That’s it! Scrape it into a container and put it in the refrigerator. It’ll keep for about a week

You may be asking if you can use something other than avocado oil. You can, but I recommend starting with avocado oil because I want your first batch of mayo to taste good. Olive oil will, for organic chemistry reasons I don’t fully understand, respond poorly to the emulsion process, giving the mayo a flavor I describe as “sawdust adjacent.”

You may also be asking how this even works. Traditionally, mayonnaise is made by vigorously whisking the eggs and the watery stuff while slowly adding oil. Adding the oil too quickly will cause things to fail, and the failure mode of mayonnaise is that it separates, and the oil floats back to the top. The immersion blender, coupled with its special made-to-fit cup, solves this problem by drawing the oil down into the blend. This is why you start at the bottom and gradually lift. You’re “slowly adding oil” by slowly giving the blender head traction on the oil above it.

Emulsification is Magic

Emulsification is when two immiscible (“not mixable”) liquids get mixed with the help of something else. In the case of mayonnaise you are mixing water and oil by giving the tiny droplets of watery ingredients (the vinegar and the lemon juice) a nice coating of egg proteins.

Fun fact! Butter is also a water-in-oil emulsification. By weight it’s about 80% milk fat (cream), 20% water, and maybe a couple of percentage points of milk proteins, sugars, and “bad at math.” This may seem like useless information, but if you’re looking for a dairy-free recipe substitute for butter, you can substitute almost any other water-in-oil emulsification. The tl;dr— Yes, you can use mayo instead of butter in recipes.

Cow-milk products are pretty complex things. There is a LOT going un under (udder?) the hood, and I’ve found that the best way to swap out a milk product is to swap in something similarly complex. Mayo can be pretty bland (it is literally used in comedy routines as a stand-in for “so bland”) but if you increase the complexity a bit it’ll do just fine as a stand-in for butter.

Sandra is allergic to dairy, mustard, wheat, and yeast, but she loves Hollandaise sauce on Eggs Benedict—a dish which, if prepared traditionally, is the Yahtzee in the game of “Sandra can’t eat this.” We prepare it non-traditionally by taking a nice Hollandaise recipe and swapping out the butter for homemade no-mustard mayo. Then we serve the sauce and the eggs on a bed of wild rice, which, if I’m being completely honest, is a healthier and tastier option than an English muffin.

Dairy-Free Hollandaise

Ingredients

  • 5 egg yolks (set aside or discard the egg whites²)
  • 2 tablespoons champagne vinegar
  • 1/4 cup water
  • 1 tablespoon lemon juice
  • 2 teaspoons finely minced shallots
  • 1/2 cup homemade no-mustard mayo
    • OR sure you can just use a stick of softened butter instead of the mayo, but then it’s not dairy-free, obviously.

Equipment

  • Immersion blender & blender cup
  • Measuring spoons and cups
  • Knife & board for mincing the shallots
  • 1 pint canning jar with ring and lid
  • A small hand-whisk or maybe just a fork that will fit into that canning jar
  • Sous vide bath, because let’s do this the easy way

Instructions

  1. Separate the eggs, and put the yolks in the blender cup. What you do with the egg whites is your business², but they don’t go in your Hollandaise sauce.
  2. Add the vinegar, lemon juice, salt, and minced shallots. Don’t be lazy and expect the immersion blender to mince the shallots for you. It’s not a food processor. Cut them up fine using your knife!
  3. Add the homemade mayo.
  4. Blend with the immersion blender. You’re not trying to emulsify, so just blend away. The mix should end up yellow and a little runny.
  5. Pour the pre-Hollandaise into the pint jar, and put the lid on loosely.
  6. Put the jar into the sous vide. The water level should be below the lid, but above the level of the stuff in the jar.
  7. Run the sous vide at 160°F for 90 minutes.
    —90 minutes later…
  8. Remove the jar (carefully, it’ll be hot) and remove the lid. Whisk the contents vigorously, then (and I cannot stress this enough) shove that whisk into your mouth and slurp the delicious Hollandaise from it. Then put it into the sink, NOT back into the jar. No, not even if you live alone.
  9. Lid the jar and put it into the fridge. It should keep for at least a week, assuming your whisk was clean.

When the time comes to serve the sauce, it’ll work well cold on sandwiches, or you can microwave a little bit of it for Eggs Benedict.

The Plot Thickens, AKA “I See What You Did There”

19th-century French chef Antonin Carême famously declared (in a book that got lots of traction) that there are five sauces mères or “Mother Sauces”: Espagnole, Velouté, Béchamel, Tomate, and Hollandaise. All other sauces are sauces petit, variations on the basics.

Of Carême’s five mother sauces, four are thickened with roux (butter and flour)³, while the fifth is a water-in-oil emulsion. My inner taxonomist screams, because that’s really just TWO basic sauces, so maybe the system should have been sauces mère et père, or just “saucy parents.”

The point here is that an ultra-simplified water-in-oil emulsion is literally THE MOTHER OF ALL MAYONNAISE.

Let me restate this more usefully: once you reduce water-in-oil emulsification to water, oil, and a binding agent, you can make any emulsified sauce you want to. In mayonnaise, the vinegar and lemon juice are “water,” the avocado oil is (SURPRISE!) “oil”, and the egg is the binding agent. The salt and mustard are irrelevant to the emulsification (provided you don’t add so much that they become relevant.)

You can make flavored mayo by messing around in the “irrelevant” column. Mother said it’s okay, really! For instance, you can make a nice Southwest seafood taco sauce by replacing the lemon and the vinegar with lime juice, using a dash of Cholula instead of mustard, and throwing in some cilantro. Did you want “spicy mayo” for sushi? Use rice vinegar and maybe two tablespoons of Sriracha instead of lemon juice, then toss in some minced ginger. As long as the general ratio of “watery” to “oily” stays the same, your mixture will emulsify deliciously.

Metrics For Science

The measurements in my recipes are all Imperial, which is problematic for two reasons:

  1. Imperial. Ugh.
  2. Milliliters are better than rounding to fractions of cups and spoons.

I’d switch to metric, but that would mean buying a bunch of kitchen stuff and learning new things, so it’s a project for a more ambitious day. Still, I recognize that if you really want to get fancy with your oil-in-water emulsifications, you’ll find that the metric system provides more consistent (especially with regards to the consistency of the sauce, hah!) results.

I’ve found a workaround, though, and that’s by using the lines on the immersion blender cup. My watery ingredients for a proven emulsion come halfway up to the 3-ounce line. The egg takes me up to the 3 ounce line, and I’m using 8 ounces of oil. This means my ratio of water to emulsifier to oil is 1.5 : 1.5 : 8. When I start messing around with other ingredients, I keep that ratio in mind, and use the lines on the blender cup to help me get the ratio correct. I also use it to keep track of what I did in case I need to change things on the next pass.

Would metric measurements be better? YES THEY WOULD please leave off with the pestering of the cartoonist and go update all the gear in your own dang kitchen.

But start by getting an immersion blender, because homemade mayo is, as I stated at the top of this essay, a million times better¹ than what comes out of a store-bought jar.

— notes —

¹ “A million times better” is sloppy math, but that didn’t stop me from using it twice. Fine. Let’s instead say that homemade mayonnaise is the thing casting the mayo-from-a-jar shadow on the wall of Plato’s Cave & Delicatessen.

² Now that you know how to make The Mother of All Mayo, those egg whites might be the elemental emulsifier for some (sorry-not-sorry) very saucy experimentation. You could also use them for an egg-white omelette, or perhaps a nice meringue.

³ Since roux is butter and flour, and butter is a water-in-oil emulsion, it should be possible to make a no-dairy/no-wheat roux using mayonnaise and corn starch and why are you looking at me like that?

⁴ My taxonomical howling is about a hundred and fifty years too late to get this bit of wordplay into all the best cookbooks. And even if I could yell back in time I’d be yelling in English, and I’m not a chef, so I don’t think Carême would listen to me.

⁵ Water-in-oil emulsion is also the mother of butter, and the mother of a long list of non-edible things, including industrial lubricants and hand lotions… although I suppose you could make your own hand lotion from edible ingredients and this is why I am not and never should be a chef.